Tag: DIY

  • If you are a house blogger . . .

    If you are a house blogger . . .

    If you are a blogger, chances are you’re either redoing your kitchen or you’re pregnant. No, seriously, go look at your RSS reader. Pregnant or remodeling their kitchen or sometimes both.

    I don’t want babies so I’m satisfying the demands of the gods by doing the only kitchen remodel I can afford: painting the door. These pictures best show the gnarly state of our kitchen door. Dinged, dented, filthy, peeling, and just sad.

    Upon taking apart the doorknob, I discovered that the previous owner had affixed it with caulk. Like the kind you use to seal your bathtub. That makes sense! I used a scraper to get the caulk off, leaving me with this mess.

    I sanded everything down but I didn’t have wood putty because of an unfortunate accident where my tube of wood putty hardened at the top and I squeezed too hard and the whole tube pooped out its contents from the bottom end, all over me. That’s pretty much what having kids is like, right?

    I wanted to get the door done before the boy returned from his work trip (Surprise! Paint fumes!) so I just painted it without filling the gauges. Enh, we’ll live. I also hit up the knob with some Brasso.

    It looks better, ya? Of course, now that the whole thing looks shiny and new I kind of feel like it would look better with a color. Maybe I could paint it yellow and Greg would feel better about the fact that I stole his yellow hallway from him.

    Or maybe that’s a bad idea.

    Sherwin-Williams Daffodil

    Sherwin-Williams Chartreuse

    Sherwin-Williams Jonquil

    The kitchen has always been tricky because the yellow counters are so cool and the floor tiles ended up being so much warmer and browner than I expected–I’m still trying to find ways to bridge the gap between the two. Regardless, I need to address the trim which still needs to be filled, sanded, and painted.

    Now go double up on your birth control and get ready to pick out faucets. Or suggest paint colors for the door if you’re feeling opinionated.

  • Removing doors and patching holes

    Removing doors and patching holes

    We have two doorways that lead to the back hallway and bedrooms: one from the living room and one from the kitchen. Only one of them had a door actually hanging from the hinges. Even if we had doors on both, we’d never use them. We just don’t have the same sense of propriety that they did in 1938 when they built my house. Realizing that we never close the door off the living room, I asked Greg if he’d care if I just got rid of it. He responded that he’d never been sure why I hadn’t removed it already.

    But that means we had this situation going on when I removed the hinges. Sorry about the bad photography–this hallway gets zero light.

    Bad pictures, ahoy!

    My friend Sarah told me about using those free paint stirrer sticks to patch these holes. They fit perfectly.

    You just trim them to fit (we used craft scissors), attach them with finishing nails (drill a pilot hole or the wood will split), hit them with some wood putty, sand them, prime them, and paint them.

    It’s like there was never a door here!

    Oh wait, except for on the other side. We haven’t figured out the best way to patch this hole yet. It’s too shallow to accommodate a paint stick. So we could chisel out a deeper hole or try to find a thinner piece of wood to patch it. We’ll probably go with the latter.

    In case anybody is worried, we are keeping the door we removed in storage. Future owners may want to be able to close off areas of the house and you don’t give away original solid-wood doors.

  • Where I continue to pay for my mistakes

    Where I continue to pay for my mistakes

    Remember how I poured boiling water down my bathroom sink and cracked it? And then how Home Depot sent me a replacement one for free because I wrote the CEO?

    That replacement sink sat in our living room for a couple of months in its humongous box because I didn’t want to install it. To put in the new sink I’d need to remove the old faucet from the old sink and then reinstall it. Installing faucets is the worst: you have to get three separate parts aligned while tightening bolts from two different sides and it just totally sucks. I did it myself when I first installed the sink and it’s a miracle that it was even close to normal looking.

    I started by unwrapping the box in the smallest area possible. Does anyone else do this? Inevitably I decide to build a huge Ikea desk in the hallway, only to discover that I’ve wedged myself into a corner and it requires an act of god to get it and me out.

    Last time I put the sink together I used a jigsaw to inelegantly cut out an area for the P-trap.

    When my parents remodeled their bathrooms the contractor used a hole saw to create a tidy hole for the pipes. This time we were going to do it right! So I went to Home Depot, bought a hole saw and the auger/pilot hole bit for it to attach to my drill.

    Except I bought a bit that’s too big for my drill. So we connected it to a socket wrench and did it by hand. That’s how we roll.

    And that mostly worked.

    Then I started to dismantle the faucet from the old sink, only to find that the plastic snaps underneath that connect the water supply tubes to the faucets are designed to be installed once. I couldn’t figure out a way to get them off without just breaking them. I’m sure they sell replacement kits online but they didn’t have them at the Home Depot, which meant purchasing another faucet kit. I don’t know about you but I can think of about a thousand things I’d rather spend my money on than a new faucet. Like curtains. Or scotch. Or new trees for the yard. Toilet paper. Anything, really.

    So Greg and I installed them and got really, really pissy with each other. I hate that part of home improvement. But it got easier from there! We had lunch! I installed the plumbing! Oh my god it was leaking underneath! Then Greg and I bickered about what was leaking (I was right, just saying), reinstalled the plunger kit again (still leaking), then tried the old plunger kit (it leaked too), then discovered that the porcelain has a tiny chip where the sink terminates and meets the gasket in the drain stem.

    Fuck. Me.

    It was really discouraging. Finally, with a magical combination of plumbers putty (which I kept calling “plutters pumby” even though I had NOT been drinking), wrenching, and swear words, it stopped leaking. Usually when I finish a project like that I feel exuberant afterward. This time I just felt like weeping because I have no confidence that this will continue to be watertight.

    The best part of this whole story? Our bathroom looks exactly the same as it did before I lost an entire Saturday to it. Okay, we no longer have a line of caulk through the middle of our sink basin, but other than that it’s the same. Do they make fifty year sinks? Next time I’m buying one of those, having it professionally installed, then never touching it again.

    Before

    After

    Have you told someone you love recently not to pour boiling water down their bathroom sink? Maybe you should go do that right now.

  • Craft projects for homeowners

    Craft projects for homeowners

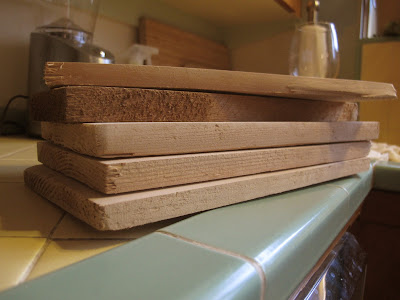
    Do you own a house? Then you probably have a stash of wood scraps like this in your garage or your basement. I have a mountain of end pieces left over from when I put in the fences. Before they were just a fire hazard but now they are destined to be poorly executed crafts!

    Have you seen this tutorial on Ready Made? You use gel medium to transfer a photo to a piece of wood. They are a little sparse on the details and you have to find the link to this video on YouTube that is buried in the comments.

    Photo source: Ready Made

    I found it a little tricky, so here’s what worked for me. I did a couple of test runs using different photos, since I have a zillion pieces of wood in my garage. I went down to Kinko’s because all the tutorials say that copies from an inkjet printer won’t work; it has to be a laserjet image. I printed out copies of photos in both color and black and white onto standard printer paper.

    You’ll want your surface to be smooth. I used my hand sander to smooth the wood down, starting with 120 grit and moving up to 320 grit, except that first I started with 220 because I wasn’t caffeinated. I couldn’t get the deeper ridges out, despite an eternity of sanding. So yeah, go get a cup of coffee and start with the low-grit, dumbass. You could also do this with a sanding block. I didn’t smooth the sides of all of the pieces because I’m an idiot. People don’t like rough edges, so if you’re giving these as a gift don’t be so lazy.

    Then you just paint on a thin coat of gel transfer using your brush (I used my trusty Purdy).


    Then slap on the photos, and make sure there aren’t any bubbles. I had some trouble with parts of images rubbing away and I initially thought that I hadn’t painted on a thick enough layer of gel medium. Subsequent attempts were made with a thicker layer of gel medium, which looked terrible and didn’t solve the problem. I think the key was curing time.

    The Ready Made tutorial tells you to let it cure overnight but other places on the Internet say to wait 48-72 hours, and this really helps, though you will lose parts of your image. So just square your thinking away right now that this will look rustic.

    Once it has cured you wet the paper on the wood block and start rubbing it away. Try to ignore how bad the grout on your kitchen counters looks.

    You’ll think you’ve gotten it all, only to let the block dry and find out that there’s still so much paper left. If you don’t remove it all your finished product will look like this, as if your friends’ baby has sprouted white hair from her face. Not so good.

    I thought I’d like black and white photos better but I definitely prefer using a color image. I used Instagram photos for that old-timey feel.

    You could swear that you got all the paper last time but nope, you need to do more peeling.

    Nope, you’re not done. Keep peeling.

    You can see that I’m losing small parts of the image. RUSTIC.

    YOU HAVE GOT BE KIDDING ME.

    Can you see what happens when you put down too much gel transfer?

    So you’re going to peeling a good long while. Toward the end I stopped soaking the entire image and instead put a drop of water on my finger and went after very small areas. This worked a lot better. I found that the longer I let the gel transfer cure, the easier the paper came up. Also? The harder the wood, the easier this part is. I had a scrap of 1 x 4 from Custom Cedar Products and the paper came up so much more easily than the pieces from Home Depot or Parr (whose boards are always flimsy in comparison).

    Then let it dry completely and slap on a coat of Mod Podge.

    Attach your hanger and call it good!

    Now if I could do it all over again I would have stained a border around the images. I think that would have elevated the look of the project. There’s probably a thousand different things you could do, especially if you were an art major and actually know how this stuff works. I’m going to keep playing with this idea, since I have eleventy million more pieces of cedar in the garage.

    So, in summary:

    1. Use the hardest board scraps you can find.
    2. Start sanding with a low-grit sandpaper.
    3. Use a thin layer of gel transfer and let it cure for 48-72 hours.
    4. Be okay with the fact that it will take more than a few rounds to get the paper off, and you may lose bits of your image.

    Also: keep in mind that your photo will be reversed when you transfer it, so if it features any kind of writing, you may want to reverse the image first in Photoshop so your project doesn’t end up looking like this:

    This was graffiti we found in Italy that looked so much like us our friends thought we painted it.

    Yeah, pretty dumb.

  • My SIL is a genius.

    My SIL is a genius.

    The boy’s sister, who I will never stop pressuring to start a blog because she does stuff like this in her sleep, made us a chalkboard hanger for Christmas.

    It’s reversible!

    I can’t believe I showed a picture with a detail of how crappy the kitchen door looks. That’s how much I love this.

  • Holiday decorating

    Holiday decorating

    I don’t normally get into decorating for the holidays. By the time I realize I should do it, the holidays are over. But! This year I actually made something. Inspired by this blogger, I created a snowflake curtain for the kitchen window. I am putting “install the light fixture I bought two and half years ago above the sink” and “finish painting the window trim” at the top of my to-do list because they are really dragging down this scene.

    The morning light shining through them makes me happy. Since this is over the kitchen sink, thus subject to steam, I hit them with spray starch and a warm iron, pressed between sheets of parchment. They are a little sturdier as a result.

    And disco Jesus and his aluminum tree have made their triumphant return.

    That’s it, that’s all I got. Laura’s doing a much prettier things over on her blog. But this makes up for the fact that we don’t have a wreath or a tree, right?

  • Where do you hide your trashcans?

    Where do you hide your trashcans?

    We currently keep our trashcan and recycling bins next to the garage, where all the ferns and shade lovers live. It makes the most sense, since it’s nearest to the kitchen. Oh, but it looks really bad.

    There was already a random fence post at the entrance to the side yard, so I slapped on a trellis and planted an evergreen jasmine to climb it. LeAnn assured me that it will take over and cover the trellis in no time.

    Though I don’t know why I’d want to cover up such craftsmanship.

    Why would I use a smaller piece of 2×4 when I could choose one that can be seen from space?

    What’s the latest and greatest way to conceal trashcans? Is anybody doing anything creative to accomplish this? Even if this manages to hide them from the street, this is the only entrance to the garden and we have to walk past them to get into the yard. Maybe I should just paint some ferns on them? There’s no way that would look bad.

  • File under: good to know

    File under: good to know

    I’m preparing to leave for our trip to Europe so instead of learning how to say, “Yes, I’d love mayonnaise on that” in Dutch I’ve been doing stupid things like cleaning out the garage in 96 degree heat. For unknown reasons I decided to take all the random wood and building supplies we have in the garage to The Rebuilding Center. I guess I thought they’d get up to no good while we were gone? Then I vacuumed the garage because home improvement isn’t fun unless vacuuming is involved. And you know what? That garage doesn’t look any better. It’s still cluttered and full of boxes. And I still don’t know how to say “cookies” in Dutch. WHAT IF WE NEED TO FIND COOKIES IN AMSTERDAM?

    Because my day hadn’t been awful enough, I headed to Ikea to scope out a new desk for the office. And I figured if I had to contend with slow-moving crowds I might as well go when I’m really dirty and sweaty. Maybe people would stay out of my way then? (They didn’t.) I made my way home with a Micke desk and proceeded to sweat and swear my way through assembling it. This desk almost bested me.

    More like BESTÅ’d me, amiright?

    Also: I forgot how bad Ikea furniture smells and how long it off-gasses. Keep this in mind because I’m going to blame what happened next on glue fumes.

    I wanted to clean the house before leaving so we could relax when we get home from our trip. The bathroom sink drain has been a little bit smelly and a tiny bit slow lately. At this point I’d like to remind you of the last time I decided to meddle with a drain that was a little bit slow. I ended up with a completely backed up drain and a sink dripping Drano everywhere. Because I never learn I decided to try a trick I read about on the Internet: vinegar and boiling water down the drain. Easy peasy!

    As I poured boiling water down the drain I heard a deafening CRACK! but I couldn’t figure out what it was. The pipe looked fine, the sink looked fine . . . except for the hairline crack that was slowly growing across the bottom. Yup, I cracked my sink. My sink, it turns out, is made of vitreous china and vitreous china cracks under high heat.

    Fuck. Me. And fuck you, Internet. You’re doing me wrong lately.

    On the plus side, now the drain looks like it wants to huuuuugggg you!
    So now I have a caulked sink (which looks AWESOME) and the possibility of hiring a refinisher to repair this thing correctly. Or I might get to replace the sink completely.

    So. Scream it from the mountaintops:

    1. Don’t use Drano.
    2. Don’t pour hot water down your drains unless you’re positive your sink isn’t made of vitreous china.
    3. Don’t dye your favorite jeans purple.
    4. Choose a desk other than the Micke if you don’t believe in swearing.
    5. Cookies = koekjes. Don’t ask me how to pronounce it, though.

    Be ye not so stupid!

  • How to build a franken-deck

    How to build a franken-deck

    Our back step had gone from being softly rotting to actively dangerous. If you didn’t step exactly in the middle of the step the whole thing would cantilever over to the side and pitch you into the bushes. We eat outside every night and we both started to feel like we were tempting fate, having someone as clumsy as me going up and down it in semi-darkness, usually with my hands full.

    My sister came this weekend and took fancypants pictures of my dried-out garden! We ate crawfish and relaxed in the backyard and drank too much champagne. 
    At one point she asked us, “Wait. You don’t have kids. What do you DO all weekend?” And we were like, “Whatever we want. Nothing or a bunch of stuff.” Actually, Sissy, this is what we do. We build franken-decks.

    You’ll want to remove the old rotting stairs, taking care to salvage the fern growing under them. You already have thirty ferns in the yard but that’s not enough. Swear when a wasp comes flying out from underneath the deck. In case there’s a nest under there, dig out the can of Raid from the basement. Put on a hoodie and gloves and watch as Greg arms himself with nothing but a hammer. Welding a hammer instead of protective clothing isn’t stubborn at all, GREG. I’m sure that hammer will protect you against a swarm of stinging insects.

    Ahem.

    We’re all good! There’s no nest. There IS a pair of socks, a Pepsi bottle, a Ball jar, a broken coffee cup, a yogurt container (Yoplait strawberry), and a can of A&W cream soda. The former home owners were hungry and a little bit sloppy, apparently.

    You know what else they were? Lazy. These posts aren’t sunk into concrete. In fact, they aren’t connected to the main platform in any meaningful way, they’re just kind of wedged under there. Cheerfully remind each other than this is a stopgap measure, and that you’re going to replace this whole deck next summer. Drive some extra nails into the posts.

    Decide to use two of the old piers you found in the yard and two new piers, just to make the measurements more complicated. Start digging a hole and realize you didn’t buy enough gravel, prompting your second trip to the Home Depot in less than an hour. Make sure to forget your phone! When you’re en route and you’re thinking, “He might need me to pick up something else, I should turn around and grab it,” ignore that impulse. JUST KEEP DRIVING.

    Get home and learn that you need a different kind of bracket. Head to Lowe’s this time, just for variety. Take your goddamn phone this time, okay? Enjoy the fact that you’re driving around in air conditioning while Greg is digging holes, tamping gravel, and measuring things in the blazing sun. This is kind of the best thing ever, actually. Get back just as he’s finishing up the crossbeams for the new step.

    Your timing is excellent.

    Decide that you should actually help build this thing. Here baby, let me nail in the treads. Be sure to drift! Greg didn’t labor all afternoon just to have you drive nails in a straight line. Also, don’t pay attention to the boards moving out of line.

    Decide to reclaim the facing board from the old rotting step, just to give it more of a shabby chic feel. Also: bragging rights. Oh, you bought new wood for your deck? We reclaimed wood from the old one because we actually care about the environment. Get an uncontrollable case of the giggles because it looks so franken-decky. That’s okay though, because the new step is SOLID.

    Eat so much chicken at dinner that you suspect Greg is wondering if you’re pregnant. (dude. no.) Driving to the hardware store that many times and hauling bags of gravel is tiring! Never mind that he did most of the work.

    Seriously though, I love doing home improvement projects with Greg. We always laugh a lot and there’s nothing more satisfying than putting your arm around the man you love while looking at your completed project and thinking, “We built that fucked-up looking thing together.”

  • It’s my house-iversary!

    On June 6, 2009 I had my reveal and the house became mine. In honor of my second house-iversary let’s take a walk down memory lane!

    Filming My First Place

    My bathroom used to look like this.

    Now it looks like this.

    My kitchen looked like this.

    Now it looks like this.

    The yard before:

    The yard after:

    The yard is still very much in process
     

    The site of the old patio slab.
    Part of this process was removing 10,000 lbs of concrete.

    The basement looked like this.
    Now it looks like this:
    The living room looked like this:

    And it looked like this after the reveal:

    And now it looks like this:

    We removed the old furnace . . .

    . . . and replaced it with an energy efficient one.

    My friend David and I (but mostly David) removed the ELEVEN arbor vitae in the front yard.

    By hand.

    And I planted two Japanese bloodgood maples.

    The dining room looked like this:

    Now it looks like this.

    I put in a new back fence, and I’m planning to put in a new side fence this summer. I painted every room in the house and have two hallways to go before I can say that I painted every paintable surface in the house. I had a lot of plumbing adventures, including putting in a new garbage disposal, changing the wax ring on the toilet, and clogging and then unclogging my basement sink.

    And I got a new roommate. He’s nice. Did I mention he mows the lawn for me? It rocks.

    Illustration by Nan Lawson

    The classic second anniversary gift is cotton. Perhaps I’ll finally buy my house some curtains for the living and dining rooms.