Tag: DIY

  • Celebrating

    Celebrating

    Six or seven years ago I made a new year’s resolution to drink more champagne. Not for boozy reasons, but rather in the spirit of celebrating small things. So I have a small number of corks from momentous times (getting accepted to grad school, my reveal, Greg moving in . . . ) and no good way to really display them.

    I grabbed an Ikea Ribba frame, the 9×9 one with the recessed mat.

    I drew a grid on the back so the corks would be equally spaced.
    I put nails through the back of the frame where the grid lines crossed.
    Then I put the corks on the nails and labeled the occasion they marked.

    I think a different color paper would look better, no? I’m not sure I like it yet but an excuse to drink more champagne is never a bad thing.
  • Things I’m thinking about

    Things I’m thinking about

    Refinishing the kitchen cabinets. It’s not on the list of 2011 resolutions but Rustoleum just came out with a new cabinet system that requires no stripping or sanding.

    Maybe a nice unglazed linen finish?

    But then I would want to regrout the countertops and finally put in baseboards, and paint the kitchen door . . . and you see where I’m going with this. But it’s tempting. Anybody have any great ideas for what color I could do that would go with both the floor and the countertops?
  • Money well spent

    Money well spent

    Sometimes I do things that, if a girlfriend was describing them to me, I’d be like, “Girl, what are you thinking? Don’t do that,” but then I do them anyway.  Hiring my coworker’s husband to do some work for me was one of those things.  The bathroom fan has gotten really REALLY noisy lately and I suspected that the duct in the attic had rattled off the motor body of the fan.  I made my boy go up in the attic with me because of the SPIDERS, OH MY GOD SPIDERS.

    We found this.

    They actually make clamps to hold ducts together and I believe they’re quite inexpensive.  But why waste $.60 when you can just duct tape everything together?  When I had the vents put in the roof my coworker’s husband, who works as a licensed contractor, set up the duct for the bathroom fan. He apparently decided this was the correct way to do it.
    We pulled off the failing duct tape and put new duct tape in the same place. If it’s good enough for a licensed contractor, it’s good enough for us. What’s the worst that could happen?
  • It’s not janky, it’s custom.

    It’s not janky, it’s custom.

    When I moved into my house there was this huge custom stainless steel plate around the floor register in the kitchen.  I didn’t think long on it (I believe my whole thought on it was, “Weird.”) because I had to tear out the kitchen floor shortly thereafter.  This is literally the only picture I could find of it.

    When the new floor went in, they cut the hole for the vent to the exact same size as before.  Which in retrospect explains the stainless steel plate.  The hole is too big for the register.
    For some reason, people like to stand on the register, which makes no sense to me at all.  People kept standing on the register and it started to bend and crack the Marmoleum beneath it.
     
     
    Fun fact! Registers come in very standard sizes.  They are either 2 inches wide or four inches wide.  They are never 3.4 inches wide, which is what I needed.  I hunted and hunted and finally found a register at Reggio Registers with a two inch bottom and a 3.5 inch top.  The only problem is that it slid around, sometimes showing the hole beneath.  I thought if I could bulk up the base then the register wouldn’t slide around and I wouldn’t have a stroke every time someone decided to stand on it (but seriously, WHY).
    One cheap paint stir stick from the Home Depot on each side, plus some 1/2″ square dowels, stacked and nailed into place.
    I’m sure this is how a real carpenter would do it. What else are those stir sticks for?
    But it worked! Son of a bitch doesn’t move!
  • Untitled Post

    Untitled Post

    What do you think, peanut gallery?

    Is it shabby chic or yard trash?  This drawer was from the old vanity in the bathroom.  I threw some cheap dowels on it, thinking I’d seen enough salvage DIY on Design Sponge to make it work.  I decided it looked stupid, then temporarily moved it to the side yard where it magically adopted the perfect leaning angle to look awesome.  
    But then I moved it to plant sedums in it and it looks not-awesome again. 
    Yes? No? Would it look great if I just had a stone statue of frogs playing checkers?
  • The deal with the post

    The deal with the post

    The biggest thing that was stressing me out about the fence was the corner post.  We discovered while we were ripping the old fence down that it wasn’t in the ground; it was just sitting on top of a rock.  A rock that was part of the retaining wall in the other neighbor’s yard.  Hmmm.

    I wasn’t sure what we were going to do about it.  The post-digging kid started to try and dig out the rock, but it went really deep.  We decided it was better to leave it.  Luckily for me David is a genius.  He suggested putting in a stringer, like we did for the vertical board fence.  I bought braces and we cut a small section from an extra 4×4 and braced it to the retaining wall post.
    Then we used small pieces of 1×4 to attach it to the side fence.
    The view from neighbors’ yard:
    Not bad, right?
  • Cue the Etta James

    Cue the Etta James

    At last . . .

    I have privacy!  I have a fence!  Two different kinds!  
    Why?  It’s sort of a long story.  
    Basically, I never noticed that there’s a dramatic elevation change as you move from the yard on the left to the yard on the right.  It drops about two feet along the length of my yard.  So when the ten foot posts went in, down in the neighbors yards, they were really sort of short on the right.  So short that if I put in the horizontal boards up like I planned, the fence would be under five feet at the right side.  So we put a vertical board fence on the right (it matches that neighbor’s other fences) and a horizontal board fence on the left.  
    My friend David, he of the arbor vitae removal, lent his expertise and helped me build this.  I have the most amazing friends.    
    I can’t tell you how heavily this project was weighing on my mind–there was an issue with the corner post that I’ll write about later and it seemed like weird things kept coming up.  For an entire year I’ve had this stupid fence hovering over me and it’s like a giant weight has lifted.  Did I stress about this fence more than was necessary?  Absolutely.  But, you know, this is me we’re talking about.  Being tightly wound is my thing.
    My friend T remarked that the vertical boards make the patio look cozy, like an outdoor room.  That’s officially the new reason we did it this way!

    I’m hoping to sweet talk my Twitter friend Lelo to help me pick out some shrubs to fill in the gaps around the perimeter of the yard so that someday I won’t even see the fence.  Hooray for getting back to obsessive plant ogling!

  • My kingdom for a yardboy!

    My kingdom for a yardboy!

    I’ve been scouting hardware store sales and craigslist for a lawnmower all winter.  Even used lawnmowers are expensive and how do you tell if a mower is “good” or not?  Can you even kick those tiny tires?

     Image source: Stories of Wisdom

    Somewhere along the way I arbitrarily decided I didn’t want to pay more than $40 for a used one.  It costs $30 to have a landscaper cut the lawn so if I ended up with a lemon at least it wouldn’t be that much more than hiring someone to cut the lawn.

    It made sense in my head.

    I found a listing for a mower for $40 that was magically still available, so I headed out to Wilsonville yesterday to look at it.  When I got there the man explained how he started it up that morning and the starter cord snapped off.  Because I’d have to pay someone to install another cord, he wanted to give me the mower for free.  I was pretty sure I could fix it myself so I tried to get him to accept my money.  We bickered back and forth and he finally agreed to take $10, but “I had to give it to his son” who was standing right there.

    Okeydoke. 

    They loaded the mower into the trunk of my Honda and even gave me an extra bungee cord to keep it in there.  These guys were so genuinely nice.

    I bought a replacement cord at Home Depot for $3.98, bringing the total cost of the mower to $13.98.  I started to unscrew things that didn’t need to be unscrewed.  Then I realized that and put them back together.

    I almost gave up.  I couldn’t see a way to get the housing off the top and fiddling with spring-loaded parts that can remove fingers makes me nervous.  Then I found this video and it seemed more manageable.

    I actually didn’t have to remove the housing at all.  I’m assuming I did it correctly because it works!  GO ME.

    To reward myself for my thriftiness I mowed the lawn, cleaned my gutters, and did some weeding.  Seriously though, the surface of the moon has fewer craters than my back lawn.  In addition to replacing the fence I really need to rototill the backyard and even it out.  And then I think I’d like to get a yard boy.  Someone nice to look at who takes care of this stuff for me.  I’ll make lemonade! 

    I’m sort of overwhelmed by my yard right now, but I’m still floating from the knowledge that for every jerk on craigslist who wants to rip you off, there’s a nice guy who cuts a broke girl a deal.  Thanks, Terry in Wilsonville.  You rock.

  • Hallelujah!

    Hallelujah!

    I have no words.  I never knew I could be so in love with a fake wood product.


    Do you remember what my basement used to look like?

    Skanky carpeting over mildewed foam over glued-down foam over vinyl tile.  I chose something called an “insulayment” which combines padding with a vapor barrier to go under the laminate flooring.  It’s pretty easy to roll out and tape together.

    But that’s upside down, dumbass.  This is better:
    Doesn’t it look like a swimming pool?
    I bribed Scott and Keith, they of the gigantic muscles, with breakfast and pizza to help me install the laminate.  They wouldn’t even drink the beer I bought them because, apparently, it’s unsafe to operate electric saws while drinking.  
    We started in the alcove. The alcove I still need to paint.  Pick carefully when you start laying down flooring!  It guides the rest of the installation and EVERYTHING will have to originate from that side of the room henceforth.
     
    You’ll want to gather as many tape measures as you can.  You’ll spend the rest of the day fetching them from the yard because Keith accidentally takes the measuring tape upstairs every time he measures, even though there’s one right next to the chop saw, but that’s okay.
    They call these “special cuts.”  Keith is masterfully accurate on a chop saw.
    Once we got past the weird areas it was just glorious feet and feet of installing whole boards.  It went super fast.  Bill showed up to help and we were so in a groove that he was relegated to documenting our progress.
     
    I’m totally tempted to buy a mirror and barre and turn this into a dance studio.  Couldn’t you just pirouette for hours? It took us five hours, start to finish, which I think is pretty damn impressive.  I’m so pleased I want to start asking strangers off the street to come down to my basement.  But that might be weird.
  • How to paint your fireplace

    How to paint your fireplace

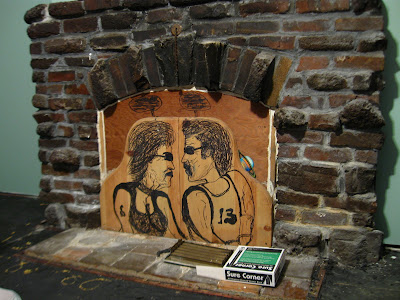
    Do you want to update your grimy old fireplace?  A coat of paint is a good option, particularly if you’re never going to use the fireplace for fire.  These bricks would look lovely with a coat of white paint.

    Before you start you’ll want to make sure that you put all the paint cans you’ve ever used (empty or full) in the basement, regardless of whether you’ll need them. You’ll want to trip over these later, especially since you’ll be wearing contacts that are the wrong prescription, making walking a little tricky.  That’s just the price you pay so your glasses aren’t fogging up constantly with a ventilator mask on your face.

    You’ll also want to plan a dinner party for the evening.  Decide that morning to make homemade bread, despite the fact that you’ve *never* made an edible loaf of yeasted bread before.  Tonight will be different.

    You’ll want to remove the tack strips that surround the fireplace hearth, lest you accidentally kneel on one of those upward facing nails.  They were left from when you removed the carpeting.  Grab your handy floor scraper and start to loosen the rotting wood.

    Accidentally take out half of a hearth stone with the floor scraper.  Whoops. 

    You know what?  You never liked those that much and they aren’t original to the house, so let’s just get rid of all of them.

    Some of the vinyl glue-down tiles popped off when you were scraping, so just scrape a few off around the fireplace.  You’ll want to leave the rest alone because scraping up all the tile in the basement would be crazy.  
    Shhhh . . . did you hear that? That was your friend Carrie, screaming “ASBESTOS IN THE VINYL TILE!” from a mile down the road.  But it’s okay; you’re wearing a mask and you’re only removing a couple of tiles.
     
    Crap.  That looks like water. Just a little bit, but water nonetheless.  Decide to switch to pulling up the tack strips that run along every wall.  
    But first, run upstairs to do the first kneading of the bread. Finally read the recipe in full and realize that it requires FOUR rises and the bread won’t be ready to go into the oven until 8 pm, never mind that you need to cook the chicken and the veggies too, all at different tempuratures.
    Add “baguette” to your shopping list and return to the basement.
    VERY IMPORTANT: put on the grimiest pair of work gloves you own so that you’re sure to leave the highest number of smudges and smears on your freshly painted walls.  If something is worth doing, it’s worth doing three times because you couldn’t be bothered to be careful.
     
    Wedge your prybar under the rotting wood and try to wrench it free from the basement floor.  Ding the drywall you so painstakingly mudded and sanded and primed and sanded and painted as many times as possible.  Once you finally have all the tack strips up, scrape some more tile from the SW corner of the basement, realizing that there’s water in other areas, too.  
     

    Realize that you really should scrape up all the vinyl tiles and put down some sort of sealant before you install the laminate flooring.  Sweep up as much of the vinyl tiles as you can and get them outside because they probably contain ASBESTOS, OH MY GOD, ASBESTOS and then use your shop vac to clean up all the debris you left.  Try to clog the shop vac as many times as possible.  
    Hint: it’s more times than you’d ever think possible.
    Spray a bleach solution on the exposed concrete in the worthless hope that this might take care of any mold issues in the basement.  The hallmark of good home improvement is a smelly house, especially if you have guests coming over that night.  
    Marvel at your updated fireplace.  Isn’t it lovely?
    The baguette?  It was delicious.