Tag: DIY

  • More progress on the basement

    More progress on the basement

    I’m finally at the point in the basement where I can paint. Huzzah!  The previous owner installed ceiling boards that remind me of carriage doors.

    There’s a lot of molding, all of which needs to be painted with a brush. As a result it takes five times as long. You probably did something fun for your three-day weekend, like go to the coast.  I did what I always do on long weekends: I covered myself in paint and went to the Home Depot without brushing my teeth or hair first.  It’s just how I celebrate.

    Have you really looked at the artwork on the fireplace?  It’s amazing!  People have a lot of opinions on who it is–Beavis and Butthead, Hall & Oates . . .

    I’m still trying to figure out what they were saying to each other.  I’m hoping it’s something along the lines of, “Isn’t this a lovely home, Daryl Hall?” and, “Rightly so, John Oates! Nary a ghost or critter here!”

    I recently won a $25 credit at CanvasPop from Apartment Therapy.  CanvasPop takes your digital image and renders it on canvas, like a real painting.  I decided to have Hall & Oates committed to canvas.  I think they’re worth it (though just barely–shipping was an unholy $14 for one rolled up canvas).

    But back to painting, I had heard you want to use a saturated color in low-light areas like a basement because you won’t have natural light to play it up.  My friend Mary has recently finished out her basement and used a lovely saturated seafoam color in her laundry room.  I loved the color so much she gave me the paint can so I could have it recreated at the paint store.  When I called the place where she had it mixed they told me it was $55 per gallon.

    I just about fainted.  $55 per gallon?  I needed two gallons!  No way, nuh uh.  I firmly believe you get what you pay for in paint, but for $55 a gallon it should paint itself onto the wall AND mix me a martini while I watch.

    I went down to Miller Paint instead and asked if they could color match it using Acro Pure as a base.  Acro Pure is zero VOC, low odor, and has an anti-microbial built into it.  Basically it’s perfect for painting a basement with minimal ventilation.  The guys at Miller Paint were great and I’m happy to say that I didn’t have another color-match mishap like I did with the dining room.  Lesson learned: get your color matching done at Miller Paint, NOT the Home Depot.  I had a coupon from my Chinook Book that was buy one get one free.  So I got two gallons of custom color paint for $31.

    The coverage is great and the color is richly saturated.  The photos really don’t do it justice.  I would absolutely use this paint again.  Two coats and I was good to go.


    I’m still trying to figure out what color to paint the inside of the alcove.  It’s presently white, but I think I want to do a chocolate color.  Then I just have to scrape the glue down padding, install the laminate my amazing parents bought me for Christmas, and this room might be usable.  Then I can move onto outdoor projects like the fence that’s falling down in my backyard.  If good fences are an indicator of good neighbors, I am that homeowner with all the junkers on the lawn and the constant visits from the police.  But more on that later.
  • Mysteries in the laundry room

    Mysteries in the laundry room

    When I moved into the house I needed a lot of electrical work.  This is what my electrical panel looked like.  Wires sticking out, no cover . . . just a tiny bit hazardous.

    Luckily I have a friend who is an electrician and would work for a reasonable rate (and access to the food in the kitchen cabinets).  He did a couple of really awesome things without my asking, like putting a motion sensor on the light in the laundry room.  So if I’m carrying a basket of laundry there’s no fumbling with a chain in the dark–the light just comes on.  After five minutes without motion it turns the light off.  It’s awesome. 

    Fast forward to now.  A few weeks back I started noticing that the light would be on when no one had been down there.  I noticed that the dryer hose had popped off the window vent and figured that must have triggered the light to go off.  Some contractor had told me that, in the hierarchy of venting, rigid metal ducts are best.  They accumulate the least dust and lint resulting in a lower fire risk.  The only problem is that I couldn’t get the stupid hose to stay connected to the window outlet. I kept finding it like this:

    I kept applying more foam tape and the stupid thing kept popping off.  I finally decided to screw the pieces together.
    Bingo!  Why didn’t I think of that before?  The only problem?  The light was still going off.
    THE LIGHT WAS STILL GOING OFF.
    My roommate and I had a very serious conversation about the light (we had both noticed it and gotten freaked out); my roommate solemnly informed me that it could be a ghost.  I was worried it was a mouse or some other critter.  I hunted around for signs of critters: droppings, nests, chewed stuff . . . but found nothing. 
    So my latest theory concerns the old stove downdraft.  My house didn’t have a stove hood so the previous owners appeared to have one of those stoves with a downdraft that vented through the kitchen floor.  There was a hole in the kitchen floor with a duct attached.
     
    That hole was covered by the underlayment for the Marmoleum and I repurposed that duct into a vent for my portable AC unit in my bedroom.  But in the winter the duct was just hanging out doing this:

    My theory is that it gets windy outside and air comes shooting into that duct and into the basement, causing the duct to swing.  I should have remedied this long ago.  I’m letting cold air into the house and basically left a fun slide for critters wanting to get into the house.  Like SPIDERS, OH MY GOD, SPIDERS.  Or mice.  Or whatever. 
    So I took the cover off the exterior of the house . . .

    . . . cut some of this stuff I found in the basement to fit . . .
    . . . screwed it in and replaced the cover.
    I’ll keep you posted about the light.  I really hope this stops the light triggering because I don’t want to consider the alternatives.  Like ghost-rats.
    Edited to add: I did finally get a cover for my electrical panel.  It feels slightly less dangerous doing laundry beneath it now.

  • Progress in the basement

    Progress in the basement

    Sigh.

    The basement. My albatross.  When I bought the house the basement had been drywalled and taped.  The seams had been mudded but they needed to be sanded.

    I hate sanding.  Really, really hate it.  I had primed the drywall but the corners needed to be taped and mudded and sanded and primed and sanded and painted and sanded . . .
    You can’t just leave rough corners like this.
    You have to get some of this.
    And some of this.
    You smear some of the joint compound on the corner and then affix the corner bead.
    Then you wipe away the excess compound and let it dry.  Then you have to put more compound on top of that, trying to make it as smooth as possible.
    Then you let that dry and sand and sand and sand.  Did I mention I hate sanding?  Then you try to remove as must of the dust from the drywall as possible and then slap on another layer of primer.
    It takes professionals no time at all to do this process.  I just watched a TV show where these pros came in and did a whole room in two hours.  It was beautiful.  I felt so lame.  This took me THREE WEEKENDS.
    But I’m finally at a point where I can start painting.  I love painting!  Once I’m done painting I can scrape the foam padding off the floor, install the laminate flooring, and then install the disco ball.
    Oh yeah. I own a disco ball. 
  • Reupholstering the dining room chairs.

    Reupholstering the dining room chairs.

    I bought my dining room set at a consignment shop called Rerun.  I intended to reupholster the chairs early on, but here we are six months later . . .

    I finally decided on a fabric from Tonic Living and it was a snap to change it out.  I flipped over the chair and removed the screws that hold the seat to the chair frame.  Then I began the process of removing all the staples.  I used a screw driver and a pair of pliers.

    Oh hey, there was another layer of fabric under there!

    And another.  Ick.

    I made sure to not vacuum before I put the fabric face down on the ground.  That way the fabric would get nice and coated with dog hair.
    I cut out a piece of fabric and started stapling it to the chair bottom.  I found this staple gun when I bought the house in a kitchen drawer, along with the aforementioned hammer, and a wrench.  I love free tools.

    Then I trimmed the excess fabric away and screwed the seat back onto the chair frame.

    It looks so much better, yes?

    Then I started on the rest of the chairs.  And promptly ran out of staples.  Damn it.
  • The new garbage disposal!

    The new garbage disposal!

    When my parents came to visit they generously asked about a housewarming gift, and was there anything (aside from many, many fattening and delicious restaurant meals) that they could get me?  I responded, “Oh, gosh, I don’t know, you don’t need to get me anything . . . A GARBAGE DISPOSAL, ohpleasebuymeanewgarbagedisposal.”  I’m subtle.

    My old garbage disposal had some bolts and metal parts rattling around in it when I moved in.  I fished those metal parts out, but I suspect they were pieces that actually helped the disposal work.  The disposal could sort of grind up things, as long as they were soft, like tomatoes.  Anything more solid than that (apple peels, potato, lettuce) would just sort of bounce around in there until I fished it out with a spoon.  My roommate had more faith in it and would put all manner of things down it, which I would later have to fish out.

    My parents and I trekked to The Home Depot and looked at disposals.  They have a helpful little box with buttons that let you hear how loud the disposal is supposedly going to be.  They have a button for the super expensive disposal (Insinkerator) which sounds like your mother, humming as she rocks you to sleep.  The next step down (still an Insinkerator) sounds marginally louder, more like someone clearing their throat.  The third button is for the Badger brand.  It sounds like a motorcycle which is being destroyed by a snarling bear with a chainsaw.

    “You’re not getting a Badger,” Dad decreed.

    They bought me an Insinkerator and even offered to pay to have it installed but I’M AN IDIOT, so I said I’d install it myself [meaning: I’d call Bill and make him flounder through it with me].  How hard could it be?

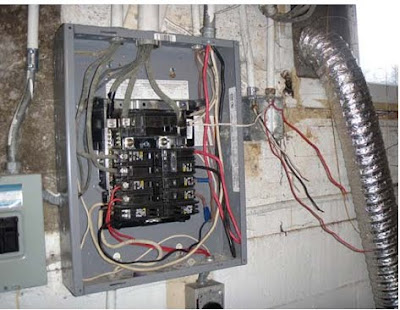
    You just remove the pipes and cut the electricity to the old disposal.
    You twist the unit off of the flange and disconnect the electrical wires.
    Easy, breezy!  We’re like a Covergirl commercial up in here, except that I neglected to shower that day, so Bill got to be all cozy with my stink, under the sink.  I’m a rotten friend.

    Spend the next TWO AND A HALF HOURS trying to unscrew the flange without damaging your very old sink.  Call your friend Keith, who’s in grad school and trying to write papers, for help.  Call the hardware store and see if they have any tips.  Roll your eyes when they tell you they’re not familiar with the Sinkmaster 750 and just how old is it?  Finally take a screwdriver and hammer and bust the flange off, using brute force and a couple of good swear words.
    High fives!  Your flange has been freed in a storm of winging plastic shards!

    Give Bill a beer while you speculate about what type of superepoxy they used to glue this cusser together.  It was probably the stuff that they use to hold bridges together.
    Start installing the new disposal.  This is so much easier!
    Bemoan the fact that your old pipes don’t fit up with your new disposal.  What a difference an inch makes.  Put all these pipes in a bag and take them to The Home Depot where you buy new pipes and extenders.  The next step is very important:
    *Leave the bag of old pipes sitting on the floor at The Home Depot.*
    Get home and realize that you left the bag of old pipes at the hardware store and pray that your new pipes will all work.
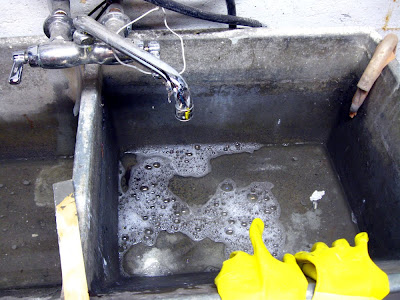
    Thank your lucky stars that they work!  Make sure that one page of instructions, the part where they tell you to punch a hole in the dishwasher input so your dishwasher can drain through the unit, is folded under so you don’t see it.  Test the disposal and scratch your head over the fact that your dishwasher now won’t drain.  Really start sweating because Thanksgiving is next week and you’re hosting ten people and sweet jesus, do you ever need your dishwasher to be working.
    Take the disposal apart and then finally realize that you missed a page of instructions.  Punch that small-but-important hole in the dishwasher input and then marvel over the fact that everything works and nothing seems to be leaking.
    Buy Bill dinner and promise him that you’ll never ask him to help with home repair again, but keep your fingers crossed behind your back.
    Get super excited about your new disposal which is super quiet and super effective.  Ignore that guy from high school on Facebook who claims he used to be a plumber and that garbage disposals cause more problems than they fix.  Also ignore your friend who tells you that you should never put food down your drain because it’s bad for the water quality.  Pout that NOBODY EVER LETS ME HAVE ANY FUN while you feed orange peels down the drain, just for fun. 
    Yay!
  • Don’t look under the trivet.

    Don’t look under the trivet.

    In my kitchen, adjacent to the old fan in the ceiling that needs to be removed, was a wooden trivet.

    I’ve been ignoring it for almost six months. There’s no reason to screw a trivet into your kitchen ceiling, therefore there *must* be something really terrible behind it.  The week before I was to host Thanksgiving I decided to deal with this.  I know.  I know!  I’m dumb; there’s no reason to start projects like these when you’re attempting to orchestrate a meal for ten people.
    Hey there, big hole.  Holes are actually no big deal, but this hole had screws that extended from the attic, through the lathe and plaster, and past where the kitchen ceiling should end.  Hence the former owner screwing a trivet there instead.
    Ha ha, just kidding, that makes no sense, no matter how you dice it.
    In order to patch the ceiling I would need to get the screws reversed enough to not poke through.  I didn’t want to climb into my attic and dig around it the insulation for the rogue screws for a lot of good reasons, but mostly because of SPIDERS, OH MY GOD, SPIDERS.  I decided to try and reverse the screws from below.  I tried a number of things that didn’t work and then one thing that worked really well.  This was my recipe for success:

    Take your drill.  I love my drill.  There would much wailing if anything happened to it.

    Remove the drill bit.

    Spin it until the grabbers are extended really far.

    Tighten the grabbers around the end of the screw.  Then depress the trigger and reverse the screws back into the ceiling.  I’m sure an expert would tell you that this is back for your drill or bad for the screws or bad for the environment, but I don’t care (and you shouldn’t) because it worked.  Once that’s taken care of you can patch the ceiling like normal.

     Apply your patch.

    Apply spackle, using a large trowel.  Let it dry and apply more if you need to. 

    Sand it.  Boy does this part ever suck.  Wear a mask and protective eyewear and know that it won’t make a lick of difference because you will be *coated* in dust.  Think about how you should be making cranberries and sewing napkins for Thanksgiving dinner.  But also think, “Hey, now I have a trivet.”

    Slap a coat of paint on the ceiling and think, “I’ll texture that spot on the ceiling later.”  Ignore for 3-5 years.  Enjoy your free trivet!
  • Adventures in plumbing or why you should never use Drano

    Adventures in plumbing or why you should never use Drano

    My parents came to visit me for the weekend and to see the house for the first time.  It was awesome.  They flew out on a Monday morning and I took the day off so I could go to breakfast with them and then unwind from the busy weekend.  I planned to do laundry and then watch a lot of DVDs in bed, maybe read a little.  I went to breakfast with them, raked my yard, and started a load of laundry.

    My washing machine has a good old-fashioned hose that hooks over the side of the utility sink in the basement.  So all the lint and hair and general yuckiness that comes out with the gray-water goes down the sink drain.  In one of my last places, a 1920 Victorian, our basement sink was constantly clogging because of this.

    My basement sink has always been slow and one side was essentially clogged.  With my laundry chugging away I decided to snake the left side of the sink a little.

    Big mistake.  I have no idea what I did but instead of a slow drain I now had a blocked drain.  Like, really really blocked.

    Backstory: this incredibly heavy cement sink has a lot of cracks in it.  When I moved in I used Drylok to patch the cracks.  Drylok is a cement-like product that dries quickly and can be used on active leaks.  It dries so fast that you better have everything ready to go before you add water or you’ll end up with a paperweight in about two minutes. Back to the clogged sink, I decided to grab some Drano from the store.  It worked when we lived in the Victorian, it would work now, right? 

    It didn’t work.

    It turns out Drano melts Drylok. It melts cement!  IT MELTS CEMENT.  So I had two full, backed up sinks that were now leaking Drano and water all over my basement floor.  It was like a nightmare.

    Once all the water had finally drained out the cracks, down the floor, and into the floor drain (thank heavens that didn’t decide to clog), I knew I had to take the P-trap apart and break up whatever clog was there.  I had a metal snake (just like this one) but I’d never used it before.  I took the P-trap apart, hoping that the clog would be IN the P-trap.  That would be really easy to fix.
    It wasn’t in the P-trap.
    It was about four feet into the drain.  I had a really hard time getting the snake past that section.  I had to poke a little, twist the snake, poke again, hoping I was finding a weak spot in the clog.  Then I tried to rasp the snake back and forth along the clog, hoping to break it up.
    This is the part where I tried unsuccessfully to break up the clog using just my hands and the snake.  It didn’t work and I ended up telling the roomie, “Don’t do laundry,” going to work, and attacking it the next day.  Long story short: you need to spin the snake to break up the clog.  I used my cordless drill.
    Feed the snake in gently, past the clog.
     
    Attach the end securely to your cordless drill and start spinning, slowly at first.  I spun the whole length of the pipe, then moved the end of the snake to where the big clog was (you could still feel it in there, pulling on the snake), and spun it again.  All sorts of gunk came out with the snake but I won’t post pictures because this is a family blog, but know that it was all very dry-heavey and sort of fantastic at the same time.  Then I put the P-trap back together and ran gallons and gallons of very hot water down the drain.
     
    Hallelujah! 
    In doing some research while my sink was slowly draining Drano and water all over the basement floor, I learned that This Old House recommends the following plan of attack with clogs in old houses:
    1. Plunge the drain.  This will often break up whatever is down there enough to flush it away.
    2. Snake the drain. 
    3. Flush the pipe with copious amounts of hot water.
    4. Call a plumber if these things don’t work.
    Nowhere do they ever recommend using Drano.  LISTEN TO THIS OLD HOUSE, ya’ll.
  • A snapshot of my mind lately

    A snapshot of my mind lately

    I wandered into the kitchen to strain the chicken stock I’d made the night before.  Then I remembered that I needed to put laundry in the machine so I went and grabbed the basket.  But then I got hungry so I started to make a snack. Then as I was sitting there, eating my snack (laundry basket by my feet), I decided I should finally hang the light fixture I bought.  So I pulled out the ladder and did that.

    Is this what dementia is like?  Will there are least be good drugs to look forward to?
  • The bedroom

    The bedroom

    I love my bedroom.  I’ve spent the least time and energy on this room so it has evolved really slowly.  It was, like almost every other in the room in the house, painted two different colors.

     I sewed curtains for the room and had planned to paint the walls gray but I just couldn’t find the right color.  My coworker gave me a bunch of paint samples and I ended up really liking one of the greens.
    Cilantro cream by Behr. I love waking up in this room. 
    I wanted something dramatic for behind my bed, as the prints I had hanging seemed out of proportion with the room.

    I settled on an outdoor shade. $30 at Lowe’s!  I found a bigger lamp (too big? what do you think?) at a consignment shop for $20.
    I really wanted a mid-century modern dresser for this wall. 
    And you know what’s crazy?  I found this one at the thrift shop by work for $65.  It’s gorgeous.  It was made in Portland by the B.P. John furniture company.  Finding it was like something out of The Secret, right?

    A quick coat with the wood conditioner and it was shiny and newish looking.  I kept feeling like the corner with the chair needed something (aside from a new reading chair).  I kept trying different artwork there until I realized that it doesn’t need art at all. 
    It needs a lamp, no?  I love this one.  I’ll never buy it, but a girl can dream. 
    I’m still not crazy about the green curtains with the green walls, so I’ll probably end up sewing new curtains at some point.  But my roommate came in recently and ooohed, “Oh, it’s an ADULT room.”  Hearing that made me jump up and down and clap my hands like a kid. Having a room I love like this is the fun part of being an adult.  The bills and the gray hair, not so much.
  • Uses for an undead boyfriend

    Uses for an undead boyfriend

    I’ve been reading the Twilight series recently. I never got around to reading the fourth book, so I reread the first three.  If you’ve been living in a cave, the Twilight series is a tweener juggernaut about a vampire boy in love with a human girl, written by Stephenie Meyer.  She’s a terrible writer but the underlying story is fun and addictive.  In her mythology vampires don’t sleep during the day and can basically pass as human most of the time.

    And you guys, her vampires are made of glitter.  GLITTER!

    Ms. Meyer could write a lecture series on Knowing Your Target Audience.  The only way preteen girls could eat up the story more is if Edward (lead vampire boyfriend) rode in on Zac Efron.  Actually, that might be a very different story, one that a mormon like Ms. Meyer probably wouldn’t write. 

    But better than the whole glitter thing I found myself thinking about what I could do with an undead boyfriend.  While I was getting my beauty sleep and otherwise preparing myself to be a productive member of society, my undead boyfriend/husband could be priming the basement for me.  What else is he going to do–watch me sleep?  That’s creepy.

     
    Because painting a basement? It sucks eggs.  There’s just no venting it sufficiently. Vampires don’t breathe, so there would be no reason to worry about wearing a mask or risk of cancer.  While he took care of the basement I could address more important activities like getting a haircut and eating cookies. 
    I was at work this week, waiting for my oatmeal to cook and flipping through the Sunday ads, when I saw that drywall primer was on sale.  I took this as a sign from the universe that I should prime this weekend.  I should have ignored the universe and watched movies instead.  First coat:

    Second coat:
     
    I still need to paint the ceiling, the edges, and throw on a third coat to the walls.  Then I need to finish all the edges where the drywall meets and basically fill in the cracks and gaps that are EVERYWHERE in the basement.  And then deal with the flooring.  I sort of want to throw up my hands because I’m not a babysteps kind of girl.  I like staying awake for 48 hours straight, working on nothing by coffee and granola bars, and getting shit done.  Not only do I lack the funds to finish the basement anytime soon, but there’s so much labor to be put in.
    Universe, get on that vampire boyfriend!